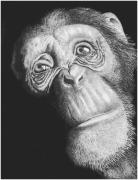
 Today's featured portrait, titled "Soulful in Ink", is actually a second version, or rendering, of the same subject, titled ironically enough "Soulful". The first version was completed in Scratchboard, and was a return to that medium for me after a few years away. The link in the title will take you to my Profile page on FineArtAmerica, where you can see both versions, as well as all the other artwork posted there. Although Scratchboard and Ink are similar looking in the end result, getting there is quite another story. In some regards, I liken Scratchboard to Sculpture or Carving, where you start out with a clump of clay or a block of wood, and try to imagine what the negative space of the final product is, and then peel it away a little bit at a time. Although you're working on a 2-dimensional sheet of scratchboard paper or board, the thought process is similar. You have to think about the ink that shouldn't be there and scrape it away, and hope that the end result will be at least somewhat 3-dimensional.
 In this case, I had a couple of small scratchboards, measuring 5"x7", lying around that I wanted to experiment with. The first attempt was my piece titled "Barn Owl", which can also be seen at the FineArtAmerica Gallery. Then, as I was working on "Soulful", I thought that this particular piece would make a good ink rendering as well. However, I didn't want to limit myself to the constraints of working on such a small piece, so I upped the measurements to 8"x10" for the ink version. What a difference those 3 inches made. That and the fact that I was back in my comfort-zone of working with laying down the ink, rather than scraping it away. I felt that I was able to get a little more depth into the end result by adding layers as I needed them.
It should be pointed out that working in Scratchboard is not always a question of taking out the negative space from the image you are working with. You also have the option of starting out with a sheet of paper or a board that has been treated with the white, chalky clay, but has not been coated with ink. This is great when you are going to have large areas of white in the rendering. Scraping away the ink coating would not only be tedious, but the end result often will not look very uniform. Instead, you add the ink to the areas that need it, and leave the rest uncovered. In this case, you will then actually add the ink as you would in an ink rendering, a stroke at a time. The desired result here is that the transition between the ink work and the scratchboard work flows seamlessly, and you can't tell where one or the other technique begins or ends.
Just a reminder here: anyone interested in purchasing Giclee prints or fully-customizable note cards through my FineArtAmerica Gallery can take advantage of 20% Savings through 2/26/2011 by using the following Discount Code: GDPDBZ
No comments:
Post a Comment